

This guide explains how to replace golf club grips: remove the old grip and tape, prepare the shaft, install the replacement with a compatible tape-and-solvent system, align it and allow it to dry before play. This guide covers conventional solvent installation. Air installation and specialized grip systems need their own manufacturer instructions.
Prepare the tools and protect the club
| Item | Purpose |
|---|---|
| Replacement grip | Confirm length, core compatibility and chosen size |
| Compatible grip tape and solvent | Use products intended to work together and with the grip |
| Shaft-safe clamp and vise | Hold the club securely without crushing or marking the shaft |
| Appropriate removal tool | Choose for the shaft material; take particular care with graphite |
| Tray, cloth and waste container | Catch solvent and collect old tape and grip material |
Work in a ventilated area away from ignition sources. Follow the solvent label for protective equipment, handling and disposal. Cutting tools must be controlled away from the body and shaft surface. If you cannot remove the old grip without risking graphite damage, use a qualified club repairer. Inspect a damaged shaft before continuing.
Step-by-step replacement
1 · Remove the old grip
Secure the club with suitable shaft protection. Remove the grip with the correct tool without cutting into the shaft. Stop if the shaft surface is damaged.
2 · Remove old tape and residue
Clean off old grip tape and adhesive using a method compatible with the shaft finish. The surface should be clean and ready for the new tape.
3 · Apply fresh tape
Measure the tape against the replacement grip, follow the tape maker’s end-fold instructions and smooth out wrinkles. Use the agreed build-up rather than adding arbitrary layers.
4 · Wet the grip and tape
Use the compatible solvent as directed to lubricate the grip interior and tape. Catch runoff in the tray and keep the workspace controlled.
5 · Seat and align the grip
Slide it fully into position while the system remains workable. Check the butt is seated and the logo or alignment feature is oriented to the clubface.
6 · Dry and check
Remove residue, leave the club in the recommended drying conditions and wait for the manufacturer’s stated time before checking that the grip does not twist or slip.
For an illustrated manufacturer example, see Golf Pride Grip Replacement Basics. Its instructions recommend at least four hours of drying for the described process; other products or conditions can require a different interval. Follow the actual grip, tape and solvent instructions rather than applying one time to every installation.
Final checks before the club goes back into use
Check the grip end is fully seated, its length is even, the alignment matches the intended orientation and the surface is clean. Once the specified drying period has passed, confirm the grip remains fixed under a controlled hand check. Do not test an uncertain installation by taking a full swing. Rework a slipping or visibly damaged grip before use.
Common problems and what to review
| Problem | Review before trying again |
|---|---|
| Grip stops before fully seating | Compatibility, tape build-up and the working time of the installation system |
| Grip is twisted or misaligned | Orientation while workable; do not force a dried installation |
| Grip rotates after the expected wait | Drying conditions, solvent/tape compatibility and installation method |
| Raised ridges or inconsistent feel | Old residue, wrinkled tape and uneven build-up |
| Marks on the shaft | Clamp protection and removal method; inspect before further work |
Adding more force is not a diagnosis. Remove and review the cause using a suitable method, or have a repair professional assess it. Keep solvents off finishes or components that the product label does not approve.
How often should you regrip golf clubs?
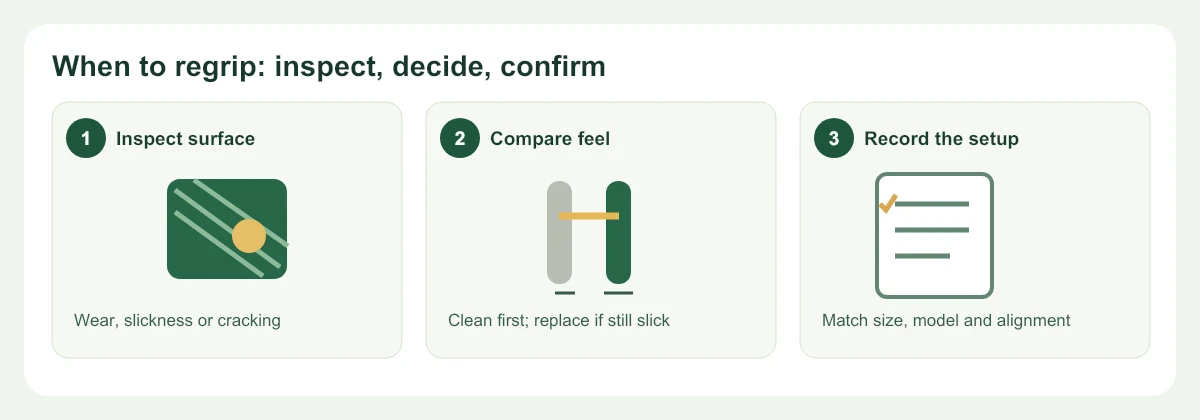
There is no replacement date that suits every player. Playing frequency, practice time, weather, hand oils and grip material all affect wear. Golf Pride recommends regripping at least annually as a general benchmark, while also advising more frequent checks when a grip shows wear. Treat the calendar as a reminder to inspect, not as a guarantee that a grip is still usable until that date.
A practical inspection before you replace
- Look: compare the thumb area with a less-handled area. Smooth or glossy patches, worn texture, fading paint fill, cracks and crumbling rubber or cord are reasons to investigate.
- Feel: clean the grip according to its maker's instructions, let it dry and compare traction with a newer reference grip. If it still feels slippery, unusually hard or unstable in your hands, cleaning alone will not restore the original surface.
- Check the installation: a grip that twists, has a loose end, or has shifted alignment needs a prompt installation check. Do not use it as though normal surface wear is the only issue.
Inspect your putter too; a lower swing count does not prevent its grip from ageing or losing traction. If one grip is worn, check the whole set so that a single replacement does not leave a mix of sizes or noticeably different feels. Before buying, record model, core size, preferred finished diameter, extra tape layers and logo alignment. Those details matter more than a generic “standard grip” label when you want a consistent set.
If the grips still feel sound after cleaning and there is no visible deterioration, keep monitoring them. If wear or slippage remains, use the cleaning guide to rule out surface dirt, then follow the installation steps below or have a qualified club repairer check the clubs.
Replacing one grip or an entire set
For one club, match the existing preferred size and orientation where appropriate. For a full set, build one reference club first and approve its feel before repeating the process. Keep clubs labeled, record grip model and tape build-up, and inspect each installation individually. Mixed shaft or grip specifications should not be treated as identical merely because the clubs belong to one set.
Planning a regripping service or branded grip program
Separate the maintenance workflow from the purchase of replacement grips. A workshop brief should list shaft materials, grip models, tools, consumables and the number of clubs. A custom-product brief also needs artwork, quantity per SKU and packaging. Neither a sample approval nor a delivery quote substitutes for an installation check on the actual club.
Frequently asked questions
Do I need a vise?
A properly protected, stable setup helps control installation. If you cannot secure the club safely, ask a repair professional rather than improvising a damaging clamp.
Can I leave the old tape in place?
For the process described here, remove old tape and residue so the new build-up is controlled. Follow any different system-specific manufacturer instructions.
How long should I wait before playing?
Use the drying time specified for your installation products and conditions. Golf Pride’s cited example says at least four hours; that is not a universal guarantee.
Can I use any household solvent?
No. Use a compatible product intended for the grip-installation system and follow its handling instructions.
How do I choose the replacement size?
Start with a hand measurement and brand-specific chart, then confirm the installed feel before replacing the full set.
What if the grip still slips?
Do not play with it. Review installation, compatibility and drying conditions, and rework or have it checked professionally.
Use the grip size chart · Discuss replacement-grip requirements
Grip alignment example

Request a custom golf grip quote
For a custom grip project, send the preferred grip size and core, surface texture, color and logo artwork, quantity per SKU, packing and delivery destination. A reference grip or finished club helps us review the specification before quoting.