
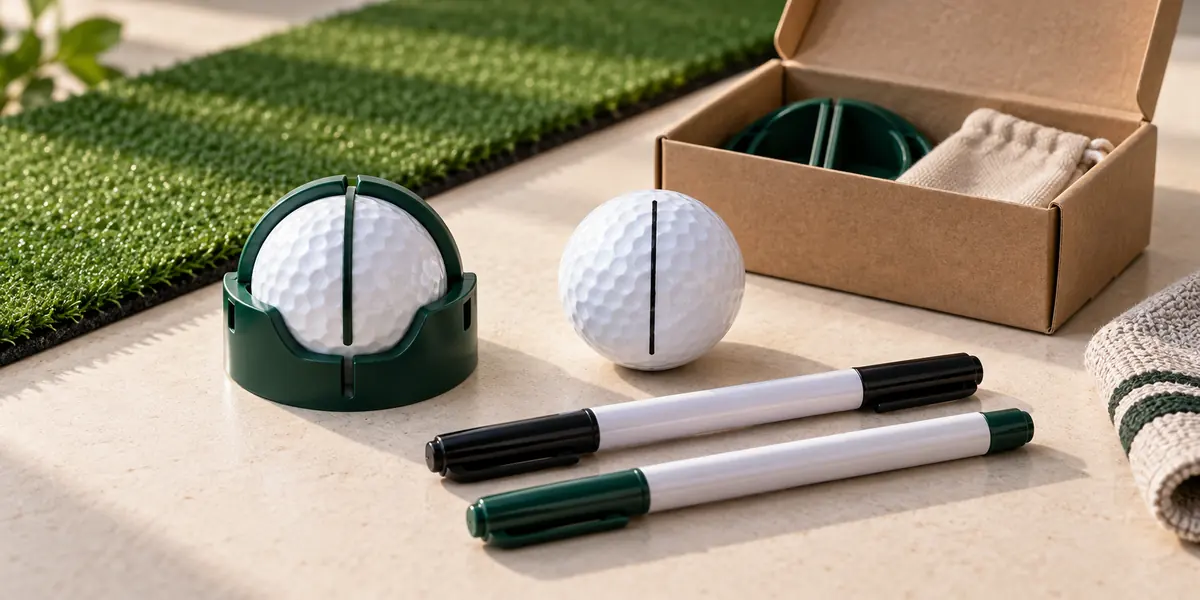
Useful custom golf ball liner sets need a stable stencil, a compatible pen and a clearly defined contents list. Compare the marks it actually produces before choosing the box or logo. A kit with more pieces is only more useful when the tools provide the patterns your players want and the pens work cleanly with them.
This guide covers the drawing tool and marker pens used to put reference lines on a golf ball. A ball-position marker is a separate accessory placed on the green; it is not the same thing as a marking pen. Keep those terms distinct in your product description and packing list.
Choose the marking pattern first
| Pattern to review | Practical selection question | Sample check |
|---|---|---|
| Single reference line | Do users want a simple visual reference? | Check continuity and whether the stencil remains still |
| Parallel lines | Does the spacing suit the intended visual preference? | Check each slot and compare the completed lines |
| Cross or directional pattern | Which parts of the pattern are actually needed? | Check intersections for pooling or blurred edges |
| Identification symbol | Is the aim to distinguish one ball from another? | Check the smallest detail and visibility on the actual ball |
These are pattern categories for selection, not a promise that every pattern is available in the current kit. Ask for a photograph of the completed mark from each proposed guide. A slot that looks attractive in a product image may create a different result when a thick pen tip is used.

Three parts of a complete kit
Stencil fit
Seat a ball in the guide and check that it can be held steadily while the pen follows the slot.
Pens and assortment
Identify the included tools and pens separately, including colors and any repeated shapes.
Packed presentation
Give each component a defined place and check the contents against the approved set list.
How to use a ball lining stencil
- Begin with a clean, dry ball and the instructions for the selected pen and tool. Test compatibility on a spare ball first.
- Seat the ball fully in the guide. Hold the assembly so the ball does not rotate while drawing.
- Place the pen tip in the selected slot and draw with steady, light pressure. Avoid forcing a tip that does not fit.
- Remove the guide carefully without dragging wet ink across the surface. Allow the ink to dry according to the pen instructions.
- Inspect the finished line, recap the pen and clean the guide as instructed before storage.
Draw and review the marks before play where practical. The tool creates a visual reference; it does not read a green or guarantee a better putting result. Do not use the stencil as an object placed on the ground to help aim a stroke. For competition use, consult the applicable Rules and the event committee.
Compare the pen tip with the slot
A narrow slot and a broad tip can be a poor combination: the tip may not reach the ball consistently or may catch the edge. A very fine tip may leave a faint line that users find difficult to see. Test the actual pen supplied with the actual stencil rather than substituting a familiar pen during sample approval.
Check line width, ink flow and visibility on the ball finish you expect players to use. A white glossy ball and a colored or matte ball may show the same ink differently. Record the pen reference, colors, cap arrangement and storage guidance; the barrel color alone is not a complete ink specification.
There is no universal drying time to print without evidence for the selected pen. Ask for its instructions, then inspect transfer after that drying period under the agreed test conditions. If ink smears, review the surface, ink and handling together before changing the copy to claim that it is permanent or waterproof.
Troubleshoot the sample before ordering
| Observed issue | What to inspect | Useful next step |
|---|---|---|
| Broken or uneven line | Tip reach, slot edge and ball movement | Repeat with the agreed pen and a firmly seated ball |
| Ink beneath the guide | Excess pressure, wet ink or stencil movement | Use the instructed technique and inspect the slot |
| Blurry intersections | Repeated strokes and ink accumulation | Review the drawing sequence and completed pattern |
| Loose ball fit | Guide geometry and contact points | Compare multiple samples using the same ball |
| Dry or leaking pen | Cap fit, storage and pen condition | Replace the affected sample and review the supplied pen specification |
The current PASSEN 4 + 4 reference set
The PASSEN golf ball liner and marker set lists four marker pens, four ABS ball-lining tools and a box. Its reference box size is approximately 12 × 11 × 6 cm and its reference set weight is approximately 90 g. These values identify the listed configuration; packed shipment weight and production tolerances require separate confirmation.
Use this contents list as the starting point for a quotation. Confirm the four guide shapes and four pen colors, and identify any repeated pieces. A golf ball, towel or other accessory shown in a scene is not included unless the quotation expressly lists it. Alternative patterns, pen assortments and packaging need review for the selected version.
Make the branding useful at actual size
Prioritize a clear brand mark and concise instructions. The available body area depends on slots, hinges and curved surfaces, so obtain a decoration drawing for the chosen tool. Pen-barrel artwork needs its own orientation and usable area. Keep printing away from working slots and moving contact surfaces unless the method has been reviewed.

A small instruction card can identify each guide and explain the basic drawing sequence. Use a completed-line illustration that matches the supplied tools. Review the card with a first-time user: they should be able to identify the pieces, draw the intended mark and repack the kit without relying on an enlarged sales photograph.
Plan packing and sample approval
Lay out all components beside the packing sample and photograph the approved arrangement. Check that caps remain secure, tools do not rub decorated pen barrels and the box closes without pressure. For retail presentation, confirm label text and barcode placement; for event bags, check how the boxed set fits with the other items.
Keep a short approval record covering ball fit, each completed pattern, pen performance, component count, decoration and packed condition. The Softspikes alignment-tool page is one manufacturer example of showing the tool in use and identifying its included marker. Apply that clarity to your own kit without assuming its construction or contents are the same.
Standard PASSEN MOQ is 200 sets per SKU; logo, color or packaging customization starts at 500 sets per SKU. Count the complete set as the purchasing unit, not each pen or guide. Different SKUs do not combine to meet the minimum. Send the approved contents, artwork, quantity, packing preference, destination and required arrival date; confirm sample terms, price and schedule for that version.
Frequently asked questions
What is included in the current PASSEN liner set?
The listing specifies four marker pens, four ABS lining tools and a box. Confirm the exact shapes and colors in the quotation.
Is a golf ball included?
Do not assume so from a photograph. The current listed contents are tools, pens and a box; any additional item must be expressly included.
Can any pen be used with the stencil?
Check the tip against the slot and test the ink on the intended ball surface. The supplied combination should be approved together.
How long does the ink take to dry?
Follow the selected pen instructions and verify the result on a sample. A single drying time should not be assumed for every ink and ball finish.
Does a liner guarantee straighter putts?
No. It draws a visual reference; green reading, aim and stroke execution remain separate parts of putting.
Is MOQ counted by individual pieces or complete sets?
For this kit it is counted by complete sets: standard 200 per SKU and customization 500 per SKU.
Discuss your project
Send your selected format, quantity per SKU, artwork, packaging and delivery destination for review.